

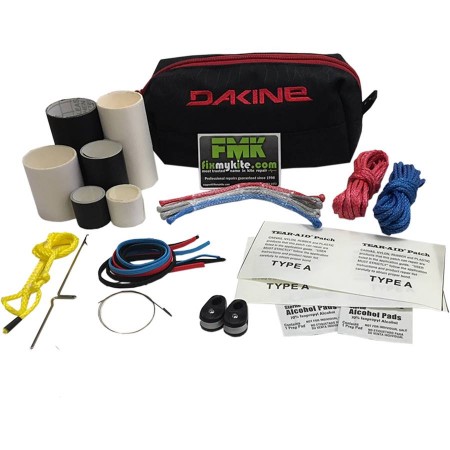
FAQ's On Bladder and Valve Repairs
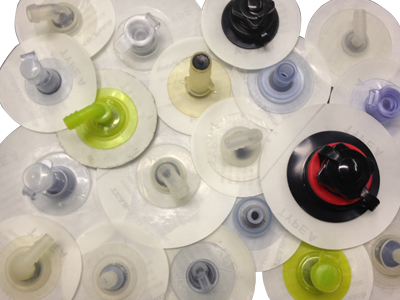
Does fixmykite.com have a stick on replacement valve for my kite?
Here at fixmykite.com we have valves that will virtually fit any kite on the market.
How to remove an old valve?
There are two ways to remove a leaking or damaged valve.
1.HEAT: Using a hair dryer or similar tool, warm the valve, taking care to not melt the bladder. After a few moments when the valve is warm to the touch carefully peel the valve from the bladder. Do not pull to hard on the valve, as this could create large tears in the bladder furthering repairs.
2.CUT: If the valve can’t be peeled of with heat, cutting is the final option. Using scissors, cut the valve off of the bladder. Use caution when cutting making certain that the opposite side of the bladder is not cut unintentionally.
How to install a fixmykite.com self stick valve?
1. Valve Removal: If replacing valve, carefully peel off old valve. If old valve does peel off, cut around circumference of valve to remove
2. Cleaning: Wipe area where valve will be placed with provided alcohol swab. DRY COMPLETELY WITH A CLEAN PAPER TOWEL.
3. Peel and Stick: Lay bladder out flat. If possible, have a friend lightly hold bladder on table or other smooth even surface. Peel off paper backing, center valve over hole, and place valve on bladder.
4. Press: Press valve from center outward to remove air bubbles and ensure proper adhesion and creases.
How to replace a large screw valve?
If the screw valve came off easily without cutting, the installation will be fairly straightforward.
1. Valve Removal: If replacing valve, carefully peel off old valve. If old valve does peel off, cut around circumference of valve to remove.
2. Cleaning: Wipe area where valve will be placed with provided alcohol swab. DRY COMPLETELY WITH A CLEAN PAPER TOWEL.
3. Peel and Stick: Lay bladder out flat. If possible, have a friend lightly hold bladder on table or other smooth even surface. Peel off paper backing, center valve over hole, and place valve on bladder.
4. Press: Press valve from center outward to remove air bubbles and ensure proper adhesion and creases.
If the valve needed to be cut out a Screw Valve Bladder Patch Install Kit may be needed.
1. Lay out the bladder on a flat surface and remove all wrinkles.
2. Prior to removing the old valve, use a marker to mark the location and orientation of the valve on the inside surface of the other side of the bladder.This will help insure when you install the patch and new valve that it will be in the correct spot.
3. Remove old valve.
4. Wipe the area around the hole in the bladder from the removed valve with the included alcohol wipe and dry completely with a paper towel to remove any residue.
5. Insert the bladder protection sheet into the hole in the bladder. This protective sheet will prevent the Tear Aid patch from sticking to the other side of the bladder.
6. Round corners and trim the Tear Aid patch as needed
7. Center the hole of the Tear Aid Patch over the location you marked earlier and peel and stick the Tear Aid to the bladder and protective sheet. Do not pull or stretch the Tear Aid during installation and the Tear Aid should go beyond the edge of the cut by at least 1".
8. Massage the Tear Aid to ensure adhesion, and if you have access to a hair dryer can you gently heat the Tear Aid during the massage to help activate the adhesive
How to find a hole in a bladder?
This process can be done without removing the bladder initially. Inflate the kite to proper pressure. Spray entire leading edge and struts with soapy solution. If there is bubbles/foam occurring this is where the hole is. Remove the bladder from the leading edge. Cap of all valves so the bladder can be inflated. Inflate the bladder to a firm pressure but DO NOT OVER INFLATE. Spray the bladder with soapy water and inspect for bubbles in the area observed prior to removal.
Can my bladder be patched/repaired?
In most instances the bladder can be patched or repaired. Depending on the location of the rip/tear we can utilize heat seal to repair the bladder. If the rip or hole is too close to the factory seam repair may not be possible.
Why are my valves coming off?
Valves are attached to the bladders by a glue-heat welding technique. If you store your kite in a hot place like a car, garage, or storage unit, the heat weld will start to break down. To prolong the life of your valves store your kite in a climate controlled area. If your valves start to delam fixmykite.com has self stick valves that will replace you factory valves.